How to make a DIY Christmas Gonk
What is a Christmas gonk?
A Christmas gonk, often referred to as a gnome, is a traditional figure in homes over the festive period. Gonks first came about in Scandinavian and Nordic mythology, but have risen in popularity around the globe for their festive appearance. They are known for their unique characteristics featuring a classic a white beard and long, pointy tipped hat. These fun little creatures can be found in a multitude of cheerful colours and sizes.

Materials
- A pair of socks (fluffy or smooth material will both work)
- 1 A4 piece of felt
- 1 piece of fake fur (roughly 4inch x 4inch)
- Pompoms
- Toy stuffing (cotton balls will work too)
- Hot glue gun (or fabric glue)
- 10cm piece of string
- A pair of scissors
- A felt tip pen
- A ruler
- Decorations (e.g., sequins, stars or stickers)
Steps:

1. Start by cutting the heel end off of the sock, leaving the closed toe portion. This should be roughly 4 to 5 inches in length for a medium sized gonk. If you want a smaller gonk, cut the sock to roughly 3 inches in length.

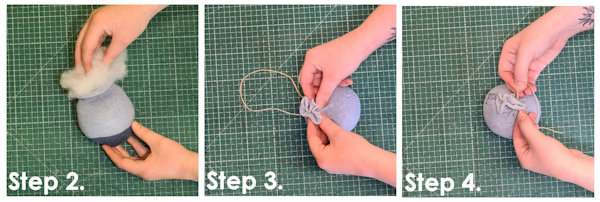
2. Take the toy stuffing (or cotton balls) and fill the sock. You will want to leave a small empty space at the top of the sock to close it up.
3. Gather the open end of the sock and scrunch the fabric together. Do this until the hole is closed and you can’t see the stuffing.
4. Holding the sock closed, take the string, loop it around the end of the fabric and tie the string in a knot to secure it in place. You may need to ask for help doing this.

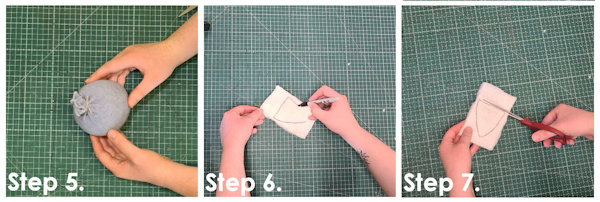
5. Use the scissors to cut off the excess ends of the string. Set this to one side while you make the beard.
6. Take the piece of faux fur, and place it fur side down. Use the felt tip to mark out the shape of the beard. This can be any shape you like!
7. Use the scissors to cut out the beard.

8. Place a line of hot glue along the side of the faux fur marked with pen, being careful to not get any glue on the fur side. Carefully place onto the gonk body and hold until the glue has dried – this takes roughly 30 seconds. Now set this to one side while you work on the hat.
9. Take the felt and use the ruler and pen to outline a triangular shape on the material.
10. Use the scissors to cut out the triangle drawn on the felt.

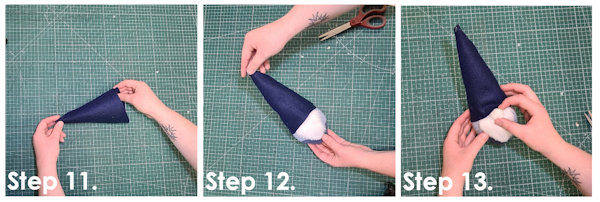
11. Fold the felt in a circular motion to create a cone shape. Hold it over the body of the gonk to make sure it is the right size before gluing the felt in place.
12. To secure the felt into the cone shape, place a line of hot glue along the edge of the felt triangle and roll into the cone shape to hold it in place. (You may need an adult to do this for you, as hot glue can burn!) Take the cone hat and add a small line of hot glue around the inside bottom edge. Place the hat on top of the body and hold it in place until the glue dries.
13. Lastly, take the pompom nose and secure to the top of the beard, just below the hat, using a small dot of glue.

14. As an added extra, try securing a pompom onto the tip of the hat using hot glue, or decorate with stars for a touch of Christmas.
You can find everything you need for this craft in store in our crafting department. If you enjoyed this craft, take a look at our most recent guide on how to make your own pom-pom wool gonks!


